Sunday, April 29, 2018

Flower Power 3

Simon Says Stamp Monday Challenge

Simon Says Stamp Work It Wednesday

Welcome!

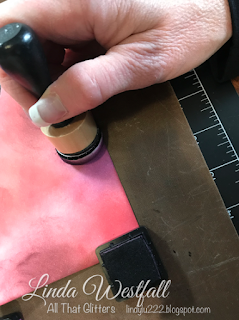
I ordered the Altenew stencil "Watercolor Bouquet." I made a bunch of cards the past week or so, and this was a more simple one. I used Simon Says Sramp inks and ink blenders to ink blended through the stencil the base layer. Adding in more colors until it was the way I wanted it. Then I used the second layer and added more ink blending. I used a Heidi Swapp Toner pen and added the second layer and did not quite want the whole second layer filled with the Toner pen, so I outlines the lower edges of the stencil. I cleaned the stencil off with some hand sanitizer, worked great!


I ran it through the laminator with some gold foil.

I then die cut the "MOM" sentiment layers from Simon Says Stamp "Script Mom Wafer die" out of some gray cardstock and 3 out of Nina cardstock. I then layered them up with some liquid adhesive and adhered it to the panel. I adhered it to a card base. and decided I wanted to keep this one pretty simple.


I have decided to add these to Simon Wednesday challenge also. Hope you have enjoyed this one as well!


Flower Power 2

Simon Says Stamp Monday Challenge

Simon Says Stamp Work It Wednesday

Welcome!

As I said in my last post, I will have several of cards to share.

 I started this card off by cutting an arch on the edge some gray cardstock with W Plus 9 "Landscape Dies." Then I decided how big I wanted the top gray panel to be, and cut it down. Next, I used Altenew "Bamboo Rose" stamp set. I set out the images in the Misti where I wanted them to be, and used an embossing buddy to prep the panel. I used VersaMark ink to stamp, then black heat emboss them.

I used Prismacolor colored pencils to color in the images and then used a white gel pen to add some details and dots to the panel. I put a piece of Nina Solar White cardstock into the Misti, and laid the stamps out where they would overlay from the gray cardstock onto the white panel. I removed the gray cardstock and stamped them onto the white cardstock with VersaMark ink and heat embossed it with Pewter embossing powder. Then I colored them in with the Prismacolor colored pencils. I used a black gel pen to add details to the white panel and adhered them together.


I stamped the Mom sentiment onto the panels with W Plus 9 "Strictly Sentiments 4" with VersaMark ink and white heat embossed it. I wrapped white bakers twine around the panels and adhered it to a card base with strong double sided adhesive and fun foam.


I have decided to add these to Simon Wednesday challenge also. Thanks for visiting here today! I hope you give this a try.


Flower Power

Simon Says Stamp Monday Challenge

Simon Says Stamp Work It Wednesday

Welcome!

I'm glad you are visiting here today. The Monday challenge this week is something with flower, and the Work It Wednesday challenge this month is Mother's Day. And naturally, I wanted to combine these two challenges. I will have a couple of posts for Mother's Day cards, but I am not sure how many I will get posted before the Monday challenge closes. 

For my first card I started off with W Plus 9 "Southern Summer Florals 2." I Stamped these with some different colors of inks and wanted to add some foil to the flowers and leaves. I saw a new Toner Pen from Heidi Swapp that I wanted to try out. I drew on some dots and lines on the various stamped images with the Toner Pen and ran it through my laminator with some silver foil. I then die cut them out with the coordinating dies and arranged them on my card panel. It's a 4 3/4" x 6 3/4" piece of Nina Solar White cardstock. 


I adhered the arrangement down with some Tombo permanent tape runner and 3M foam tape. 

I then die cut the "MOM" sentiment layers from Simon Says Stamp "Script Mom Wafer die" out of some gray cardstock and 3 out of Nina cardstock. I then layered them up with some liquid adhesive and adhered it to the panel.
I added some silver washi tape the all 4 front edges of the card base and adhered the card panel to it.

This completes this card. 

Loved how the Toner pen worked and plan on using it again soon.

Hope you have a great day!


I have decided to add these to Simon Wednesday challenge also.


Tuesday, April 24, 2018

Wreath Builder

My Favorite Things Color Challenge #91


Welcome!

I hope you are having an awesome day! The sun is shining! The tank is clean. HeHe. That always comes to mind after "the sun is shining" anymore.

I built this card starting by making my own type of a wreath builder stencil since the Gina K one seems to always be sold out. Its not perfect, but it go the job done.

I  laid a 4" piece of Nina Solar White cardstock into my Misti stamp positioner and positioned the biggest flower from My Favorite Things "Bold Blooms"onto the panel. Then I stamped it in a dark pink color. I rotated my cardstock one position and stamped it again. I continued in this fashion all the way around the panel. I did this with all of the stamping. 

Then I die cut the "YOU" from My Favorite Things Die-Namics, All About You out of the panel. I also cut another "YOU" from some black fun foam.

I took a coordinating pink card base and adhered a piece of black cardstock on top of it. Then I adhered the card panel on top of that. I glued the die cut letters cut out of fun foam into the correct spaces and then the Die cut letters.


I stamped a sentiment from the "All About You" set onto a piece of black cardstock and white heat embossed it. and then adhered it to the card.

Thanks for visiting.


Saturday, April 21, 2018

"SMILE"

My Favorite Things Sketch Challenge 381

For my inspiration for this card, I was just playing around with a technique that I saw recently from an Altenew video by Lydia. Here

I was not planning on using this, but it actually turned out first go around, but I was not recording or taking pictures along the way.

I cut the "Smile" Die-Namic from My Favorite Things out of some Eclipse masking paper and laid the negative space, centered, onto a panel of Nina Solar White cardstock.

I blended the smile in with some My Favorite Things Inks. Insulation pink at the top, blended into Bubblegum Pink at the bottom. Then to fill it in, I used a stamp set by W Plus 9 called "No One Else" You can use any stamp set that you have that has really small images for this. Because of the size of the spaces in the smile, I wanted to see what I was stamping. For larger dies, you could use larger images.

I covered them with a Wink Of Stella clear glitter pen, and then stamped my sentiment from My Favorite Things " All About You" in VersaFine black ink.


I layered it up onto a Rose Red cardstock and then onto a white card base. I added three clear Nuvo Crystal Drops to the lower right hand side of the card.


And that completes this card. I hope that you will give this a try. I can't wait to see what else I can think of to do this technique with.


Let's Doodle

Sparkle and Shine

Welcome!


I hope you are having a great day!

When I looked the Monday challenge this week, I immediately knew that I needed to do a Mandala card. I participate in a Bunko night once a month and I always doodle a Mandala flower around the "o" on the Bunko sheet. 

The Wednesday challenge is "Sparkle and Shine" and, well, I do love me some sparkles. So that will be included in these cards as well.

I started by ink blending some panels of white cardstock with "Distress Inks." 


The ink blending does not have to be perfect, because a lot of it is going to be covered up.

Once the ink blending is done, you could draw out what you wanted your Mndala to look like, which I started to do here and then just went for it.


I am using a black Sharpie Oil Based Paint pen, and drawing in the parts that I want to be black.


Once the whole panel is covered with where you want the black, then I use a white Gel Pen to add more details. I only show a little on this example, but you can see what cool effects you can get on top of the blended background with just black and white. You could also do this technique with some patterned paper.


Once I was done with the Mandala, it was time to add a sentiment on top of it. I used some from Simon Says Stamp "Handwritten Borders."  I used a Misti stamping tool so that I could curve the sentiment around where I wanted it to be stamped. I stamped them in VersaMark ink and then used white embossing powder and heat set it with a heat gun. 


I mounted the panels onto some coordinating colored card bases. And then added strips of sequins to some of the arched areas of the Mandalas.


This completes these cards. I hope you find some inspiration in these cards. And you give these a try.


Monday, April 9, 2018

Smile- It's Your Birthday

Sketch Challenge 379

Welcome!

I hope you are having a great day! I started off this card with some inspiration from a card I created about a year ago. I cut the smile with the die cuts from My Favorite Things "Double The Smiles." Only cutting to the bottom edge of each one.


I then took my T-ruler and cut a straight line between each letter, so that the top of the letters are not attached to the panel.


I forgot to take pictures of all the steps, but it was pretty simple. I stamped a small solid line, the polka dot twice, and the larger solid line with Waffle Flower "Pattern Play." I stamped the Reverse Polka Dot background from Simon Says Stamp and then layered the panel onto it. Then layered that onto a piece of black cardstock, and then on a white card base. 


Then I stamped the leaf from My Favorite Things "Pressed Flowers" and the sentiment from My Favorite Things "All The Smiles" onto the panel. I stamped the flower from the onto a separate piece of cardstock and used the Coordinating die to cut it out.

You can play along with the My Favorite Things Sketch Challenge here.

Create something beautiful!


Friday, April 6, 2018

Happy Birthday Simon Says Stamp!

Wednesday Challenge

Welcome.

I hope you are having a great day. It was fun to post this today for Simon's Birthday because it happens to be my birthday today. 

I started off by stamping the Reverse Polka Dot background  onto a piece of Nina Solar White Cardstock in My favorite Things Cement Ink.


Then I stamped some of the flowers from Simon's Bold Flowers onto a another piece of Nina Solar White Cardstock. I used a variety of Stampin' Up! inks and went back and stamped a second time on the leaves with a darker color to give them more dimension.


I do not have the coordinating die for this set, so I fussy cut them out. I attached my polka dot panel to a piece of Strathmore Toned Gray paper and also a piece of Nina cardstock so that the card would not be flimsy.


I used some press and seal after I had figured out my placement to pick up the arrangement. I find it helpful to add something to the top of the press and seal so as you are moving the bottom layer off, you still have a reference to the top of the paper.


I used Tombo permanent Tape runner to adhere the inside of the leaves and curled up the outer edges of the leaves.


I added one layer of foam tape to the next layer of flowers and then two layers to the last two center flowers and curved the edges of these as well. I stamped my sentiment from Simon's "Birthday 
Messages" onto a piece of Nina Cardstock and layered it onto a black piece of cardstock. I cut the end banner style on the right, and straight on the left and adhered it to the card. I added some Wink Of Stella to the centers of the flowers.


That completes this Birthday card.

Visit Simon's Wednesday challenge here.

Again, Happy 9th Birthday Simon Says Stamp!


A Trio of Something

Fancy Florals

Welcome.

The challenge for Monday is to use products from Dyan Reaveley. I have to say that I did not realize that I owned anything from this designer. So I clicked on the link from her name to see what she has designed to get a feel of what I wanted to create. Then realized that I owned one stamp set and a coordinating stencil. I do not use texture paste very often, but I felt that this stencil was telling me to use this technique. I used a piece of Arches cold press watercolor paper.


 After I applied the paste and let it dry, I used an air puffer or spritzer tool to add some soft color with copic markers. I love how this part turned out, so I decided to take the spritzer tool to the flowers as well, but with stronger color. I stamped the flowers from DYlusions "Fancy Floral" in Simon Says Intense black ink onto a piece of Nina Solar White cardstock. Then I cut them out.


I wasn't sure how I felt about them after, and used some Prismacolor colored pencils to try to add some more detail to them so they didn't look like I colored them with the big school crayons.


I finally decided to try adding some color with Copic markers.  I added the Mother's Day sentiment from W Plus 9 "Strictly Sentiments 4" in Simon Intense Black Ink. I also added a sentiment to the inside of the card from the same set. I added some splatters to the card with a Copic marker.


I added some pearl drops to the card. I really love the soft background, and I am going to definitely use this stencil again.


If you would like to participate, visit Simon's Monday challenge here.

I hope you have a great day!


Monday, April 2, 2018

Wishing You The Best

MFT Sketch Challenge

Welcome!

I started my card by stamping a panel in Simon Says Stamp Reverse Polka Dot background stamp with My Favorite Things Cement Gray Ink.  


I stamped some flowers and leaves from the My Favorite Things "Pressed Flowers" and leaves from "Bold Blooms" stamp sets. I used the coordinating die for the "Pressed Flowers,"  and fussy cut the leaves since I do not own the dies that coordinate with that one. I stamped my sentiment from My Favorite Things "Big Birthday Wishes" with Simon Intense Black ink.

 I mounted the panel onto a Nina Solar White card base. Then I layered the leaves and flowers, adhering them with Tombo permanent tape runner and 3M foam tape.  I decided that I liked the layout better without a square or  rectangle behind them. I adhered the sentiment to some black cardstock with the Tombo tape runner, and then to the panel with 3M foam tape.


I hope you have a terrific day!

If you would like to participate in My Favorite Things challenge visit here.


adding pinterest script 3. Changing the Position of the Pin it! button The cool thing about this code is that you have some freedom over where the Pinterest button for Blogger will go over the image. Take a look at the code that you just copied and pasted into the HTML for the word 'center'.