Thursday, November 29, 2018

Color Your Day

70-20-10

Welcome!

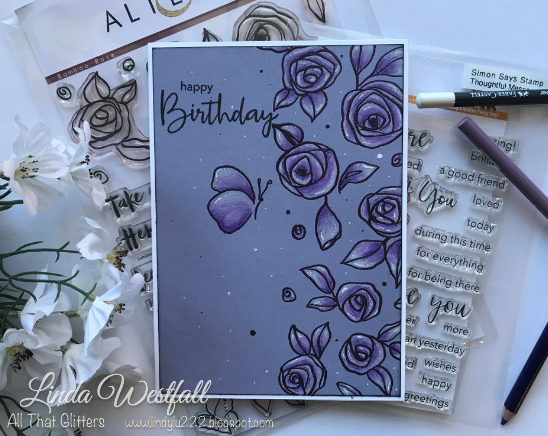
 I am calling this project my 70-20-10 project or another way I have heard it referred is gallon-quart-pint. I don't generally think in this manner, but when I focus on this technique, I do like the results.


I started my card today by stamping the twig from Altenew Freeform Greenery stamp set in Pure Graphite Crisp dye ink. I have curved the stamp on the block so that it stamps in a more circular form. 

Next, I stamped the leaf from Altenew Remember This in Silver Stone Crisp Dye ink.

Then I took a small leaf cluster from Altenew Beautiful Heart and stamped that with Moss Crisp Dye ink.

Then I used the little bud/berry stamp from Altenew Freeform Greenery and first stamped it in Coral Bliss Crisp Dye ink and then in Sunkissed Crisp Dye ink.


I adhered the panel to a coral colored card base.

I blended a scrap piece of card stock in the Coral Bliss Crisp Dye ink and the die cut the Thank You from Altenew Flower Arrangement dies. I cut it three times in white and once from the blended card stock. I adhered them together with a Two-Way glue pen.


I wanted the sentiment to be a little darker, so I pounced some Vineyard Berry Crisp Dye ink onto it. Then I adhered it to the card with the Two-Way glue pen.

I have heard that your neutrals do not count in the calculation of this technique, but I considered the coral as my gallon, the green as my quart, and the yellow as the pint. Hope you enjoyed this.

Thanks for joining me!


The inspiration for this project came from a scrapbook post that I saw from altenewscrapbook.com. Enza Gudor had a project that was featured. I could not locate it when I went back to find it. But it was stunning.


Beyond Basic Backgrounds

DIY Stencil

Hello,

I hope you are having a great day.

I liked the class where freezer paper was used and adhered to a panel with an iron. I made a card using that technique, but I also liked the lesson where you create your own stencil. In the lesson, she used normal card stock to create the stencil, but I used some Eclipse Masking paper to create my stencil.

I cut the leaf from Altenew's Garden Treasure Dies several times from a piece of Eclipse Masking Paper slightly larger than a card panel. I cut more leaves on one end than the other, then laid the masking paper on a Neenah Solar White card panel.

I blended Frayed Leaf, Forest Glades, Moss, and Hunter Green Altenew crisp dye inks, working from the bottom with the lighter ink to the darker at the top.
I used the leaf stamp from the coordinating stamp set with VersaMark ink and gold heat embossed them.

I used the inks to blend round the outside of the card base and also a strip of Neenah card stock for the sentiment.


I stamped the sentiment from Altenew's Mega Succulent stamp set with VersaMark ink and gold heat embossed it. It did not show up as much as I wanted so I stamped it again but offset slightly, with the VersaMark ink and white heat embossed it.

I cut a piece of velum to layer the sentiment strip on top of.

I adhered 3M foam tape to the back of the sentiment and adhered it to the card with some gold threads underneath it.

Finally, I added some gold sequins to the panel and then I adhered it to the card base.

Thanks for visiting here today.


Wednesday, November 28, 2018

Polychromatic

White With Pops Of Color

Welcome.
Hope you had a wonderful Thanksgiving. When I was thinking about which lesson I wanted to focus on, originally I was drawn to the monochromatic theme. I started my card today by cutting the Merry and Christmas out of the Merry Christmas Dies from Altenew from Neenah Solar White 80 lb. card stock a bunch of times and I also cut some out of black card stock as well. 
I applied VersaMark ink to some of the white paper die cuts and silver heat embossing them. Then layered them offset on top of the black die cut pieces.                                                               I ink blended a background panel and layered the die cuts on top of it. This is the point that I decided to go a different route than what I originally thought.
I die cut the Merry and Christmas dies again out of some fun foam to create a stamp out of the dies. I then stamped them diagonally onto a new panel of the Neenah card stock.
I laid the silver heat embossed dies underneath the stamped ones and continued stamping the images down the panel. 
I cut a large snowflake from Concord & 9th Snow Flurry Dies out of Clearprint Heavy weight velum. I then used the Ranger Perfect Medium on the edges of the large snowflake and silver heat embossed it. 


For the pop of color on my card, I blended Coral Bliss Ink from Altenew onto a scrap piece of Neenah card stock. I then cut the smaller snowflake out of this blended panel.


I wanted the outside of the  snowflake to be darker so I pounced some Vineyard Berry ink onto the edges of the snowflake.

I used the same two colors of ink to blend on the outer edges of a white card base. 


I adhered the panel onto the card base with some Tombo Mono Tape Runner Adhesive. I used a liquid Two-Way Glue Pen to adhere the small snowflake to the large snowflake and then to adhere it the panel.

I cut thin strips of 3M foam tape and adhered the Merry Christmas to the card with them.

I adhered a large rhinestone tot he center of the snowflake.

Before the colors dried all the way it was a little more red than it ended up being. But I still love the way this card turned out.

Thanks for joining me!


Monday, November 19, 2018

Impressive Heat Embossing

Heat Embossing for coloring

Welcome!

I wanted to use some colored heat emboss powders to create my card today. But I could not decide what color I wanted to use, so I tried out several and will just share two of them.

I laid out the stamps from Altenew Bamboo Rose stamp set into my Misti stamping tool and stamped them with VersaMark ink onto the purple panel and then used Recollections Amethyst embossing powder and heat set it. For the orange card, I stamped the image with Altenew Expresso Crisp Dye ink first, let it dry a second, then stamped it in VersaMark ink and clear heat embossed it to look like it was a brown embossing powder.

I colored the images in on both cards with Prismacolor colored pencils and added some white details with a white gel pen. I added some black dots tot he purple card with a Faber Castell Artist Pitt pen.

I stamped the sentiment onto the orange panel with Simon Says Stamp Sketched Flowers in VersaFine Onyx Black ink. I stamped the sentiment onto the purple card with Simon Says Stamp Thoughtful Messages with VersaFine Onyx Black ink.

I rubbed the outer edges of the panel onto the VersaFine Onyx Black ink pad and let them dry before adhering to white card bases.

I think using heat embossing and then coloring in the images is a fun technique.

Thanks for joining me!


Beautiful Details

Adding Details to a Stamped Image

Welcome!

I started my card by stamping the lower corner flower from the outer layer stamp from Altenew Beautiful Heart stamp set on a piece of gray card stock cut to 4 3/4" x 6 3/4" and masking off the flower where I needed to add the other flower and the leaves.

Then I used Prismacolor colored pencils to color the flower and add the details to the panel. I first colored the images in an blended the colors together and then I went back over the images and added some line details and more darker and lighter color to add dimmension.


I then stamped the sentiment onto the panel with Hero Arts Best Wishes with VersaFine Onyx Black ink.
I outings all the images with a Faber Castel Pitt Artist Pen, Small and then rubbed the edge of the panel onto the VersaFine ink pad. Then I adhered the panel to a white card base.

I think this set of classes were my absolute favorite! If you are looking to take some classes, the Beautiful Details classes from Altenew would be my top suggestion.

Thanks for joining me.


Monday, November 12, 2018

Magic Marker Techniques

Making a Stencil and Filling it in.

Welcome!

The lessons were using Altenew Alcohol markers, but since I do not own any of them, I will be using a Copic marker. And I will be doing a different technique with it than was shown in the classes. 
I am starting the card today by cutting a mask with Eclipse masking paper and the Leaf Frame Cover die from Altenew. I adhered the negative portion of the mask to a Neenah Solar White 80 lb. card panel. 
I used an air Spritzer tool and a BG75 Copic marker to add color to the panel. I originally thought I would make it more like an ombre background, so I used three colors and removed the mask but did not like it. I put the masks back onto the panel and did it all over with the BG75 marker.
I removed the masked and added Wink Of Stella clear pen all over the green leaf parts. 


I blended a piece if Neenah Solar White card stock so I could Die cut the Hello from Altenew's Flower Arrangement dies with Galactic Stream and Emerald Crisp Dye Inks. I used both of the colors to try to match the Copic marker. I cut three white hello's and one out of the blended piece.  I adhered them together with a two-way liquid glue pen.

I added clear Wink Of Stella over the Hello and then clear heat embossed it. I adhered the leaf panel to a white card base and then adhered the Hello to the middle.


Thanks for visiting!


Creative Watercolor Media

Using Ink Pads to Watercolor

Welcome!

I hope all is well. 

For my project today, I will be using Altenew's Tulip stamp set, Altenew Crisp Dye Inks, My Favorite Things STAX Rectangle dies, VersaMask ink, 140 lb. Canson XL watercolor paper, Clearprint 48 lb. velum, The Paper Studio Pearlized card stock, Recolections Champagne embossing powder, and a Stampin' Up! Crushed Curry card base.

I stamped the tulips using the Tulip stamp set with VersaMark ink and heat embossed them. I watercolored them using Altenew Pocketful Of Sunshine inks, the Floral Ink Set and Moss. 

I was not sure what I was going to do with the panel so I stamped the sentiment onto the velum and heat embossed it. It needed a little something, so I rubbed the edge into VersaMark ink and heat embossed the edge with the Champagne heat embossing powder as well and set that aside.

Used the Rectangle STAX dies to cut a frame from the dark green Pearized card stock and laid it over the watercolored panel to figure out what I wanted to do. I liked it on the left edge, so I used the Rectangle STAX dies to cut the frame from the watercolored panel as well. I  cut a small strip of Pearlized card stock to go along the edge. I adhered them all to the card base, and then adhered the velum strip with some velum adhesive on the outer edges and some Ranger Multi Medium Matte behind the letters.

Hope you have a fantastic day!


                           With a Twist


Cutting it Oddly

Welcome!

I will be using Altenew Painted Butterflies stamp and die sets to create this card, and I wanted to cut the card oddly for this lesson.

I started by cutting the right side of my panel with the My Favorite Things Stitched Scallop Basic Edge die. Then I ink blended it with Faded Jeans Distress ink. Since I had run this through my big shot to cut the edge, it did not blend nicely. So, I blended a panel and then cut the edge afterwards. I then spritzed the panel with water, blotted the excess off. Then used some diluted Faded Jeans distress ink and splattered that over the panel. I then used some diluted white acrylic paint to add some splatters of white to the panel. I set that aside to dry

I used the Painted Butterflies stamp to stamp the butterfly onto another piece of Neenah Solar White card stock in Jet Black ink. Then I used the layers with Citrus Burst and Maple Yellow inks to color the butterfly. I used the coordinating die to cut it out. Since you would see the edge of  the butterfly from the back, I used a Faber Castell black Artist Pitt Pen to draw the butterfly on the back, and colored it in with a little Citrus Burst ink and a piece of a microfiber cloth.

I stamped the other two butterflies on the front of the panel with Jet Black ink.

I cut the edge of a dark pink card base to match the line of the scallop edge and adhered the panel to it. I then foam mounted the yellow butterfly to the panel and used a Wink Of Stella pen in clear to add sparkle to the butterflies.

I stamped the sentiment from the stamp set onto a strip of Neenah Solar White card stock in Jet Black ink and cut the edge on a diagonal. I rubbed some Faded Jeans distress ink along the edges and foam mounted that to the card.

Lastly, I added some dots of Ebony Black Nuvo Crystal Drops around the panel.

Thanks for joining me here!


Thursday, November 8, 2018

Masking Unleashed

Basic Masking

Welcome!

I have seen a Christmas card at a couple of craft stores in our town that uses the same photograph and I wanted to try to recreate it.

I started by creating a circle mask out of Eclipse masking paper that will be for an ornament hanging in a pine tree. After I placed the mask on my Neenah solar white cardstock I blended a background with Distress inks. 
I then used water to create a Bokeh effect on the bottom of the panel. I enhanced the three whiter spots by adding some white acrylic paint.
Stamped the pine boughs from Avery Elle Holiday Bouquet stamp set with Altenew crisp dye inks.

I removed the mask and colored the ornament in with Copic markers.

I used a White gel pen and added snow to the ornament and al the pine boughs.

 I cut the ornament top from Stampin' Up! Delicate Ornament Thinlit dies. I added that to the panel with some silver thread by tying it to the topper and taping it around the back of the panel.

I adhered the panel to a red card base and then added the sentiment with Altenew Mini Christmas stamp set using VersaMark and red heat embossing it.


Thanks for joining me. 


adding pinterest script 3. Changing the Position of the Pin it! button The cool thing about this code is that you have some freedom over where the Pinterest button for Blogger will go over the image. Take a look at the code that you just copied and pasted into the HTML for the word 'center'.