Thursday, September 29, 2022

ALTENEW: STICKY ESSENTIALS BLOG HOP + GIVEAWAY 

($300 in total prizes)


Hello,

I hope you are having an Amazing day! If you are following the hop, you should have found your way here from the amazing Tenia. And if you would like to go back to the beginning, you'll find that over on the Altenew Card Blog.


Altenew has a fantastic assortment of sticky products, and I have used several to crate a card for you today.
I have created a video for you to enjoy All Things Sticky.


Thanks for visiting!
Make Today Amazing!

Your next stop is Seeka.


GIVEAWAY

$300 in total prizes! To celebrate this special blog hop, Altenew is giving away a $50 gift certificate to 2 lucky winners and a $25 gift certificate to 8 winners! Please leave a comment on the Altenew Card Blog and/or each designer’s blog post on the blog hop list below by 10/05/2022 for a chance to win. Altenew will draw 10 random winners from the comments left on each stop of this blog hop and announce the winners on the Altenew Winners Page on 10/06/2022.


Thursday, September 22, 2022

ALTENEW: SEPTEMBER 2022 ENCHANTED WINTER RELEASE BLOG HOP + GIVEAWAY 

($300 in total prizes)


Hello!

Welcome to Altenew's Enchanted Winter Release. You should have found your way here from Seeka's blog, and the full blog list, as well as more inspiration can be found over on the Altenew Card Blog.


I love the Blooming Flower Bed Builder Stencils and the ease in adding different colors to the various kinds of floral elements in the set. I added the sentiment with the Tiny Sentiments: Wishing Stamp and Die Set.


I enjoy when Altenew coordinates stencils with the embossing folders, and the next two examples I have used the previously released embossing folders with the Stencil Sets that have been released. Above, with the help of the Embossing Folder, the Daisies seem to easily become 3 dimensional.


And with the Gentle Butterfly, it looks like I have cut it out and added it to the background.


With this release, Altenew has some new colors of Enamel Dots that are a fun addition to any card. To highlight the enamel dots as well as all the kinds of adhesives they carry, I created this card. I saw Yana do something similar a while back, with a stencil. I used the satin masking tape to create the background colors.


Here are some of the different kinds of adhesives that Altenew carries.
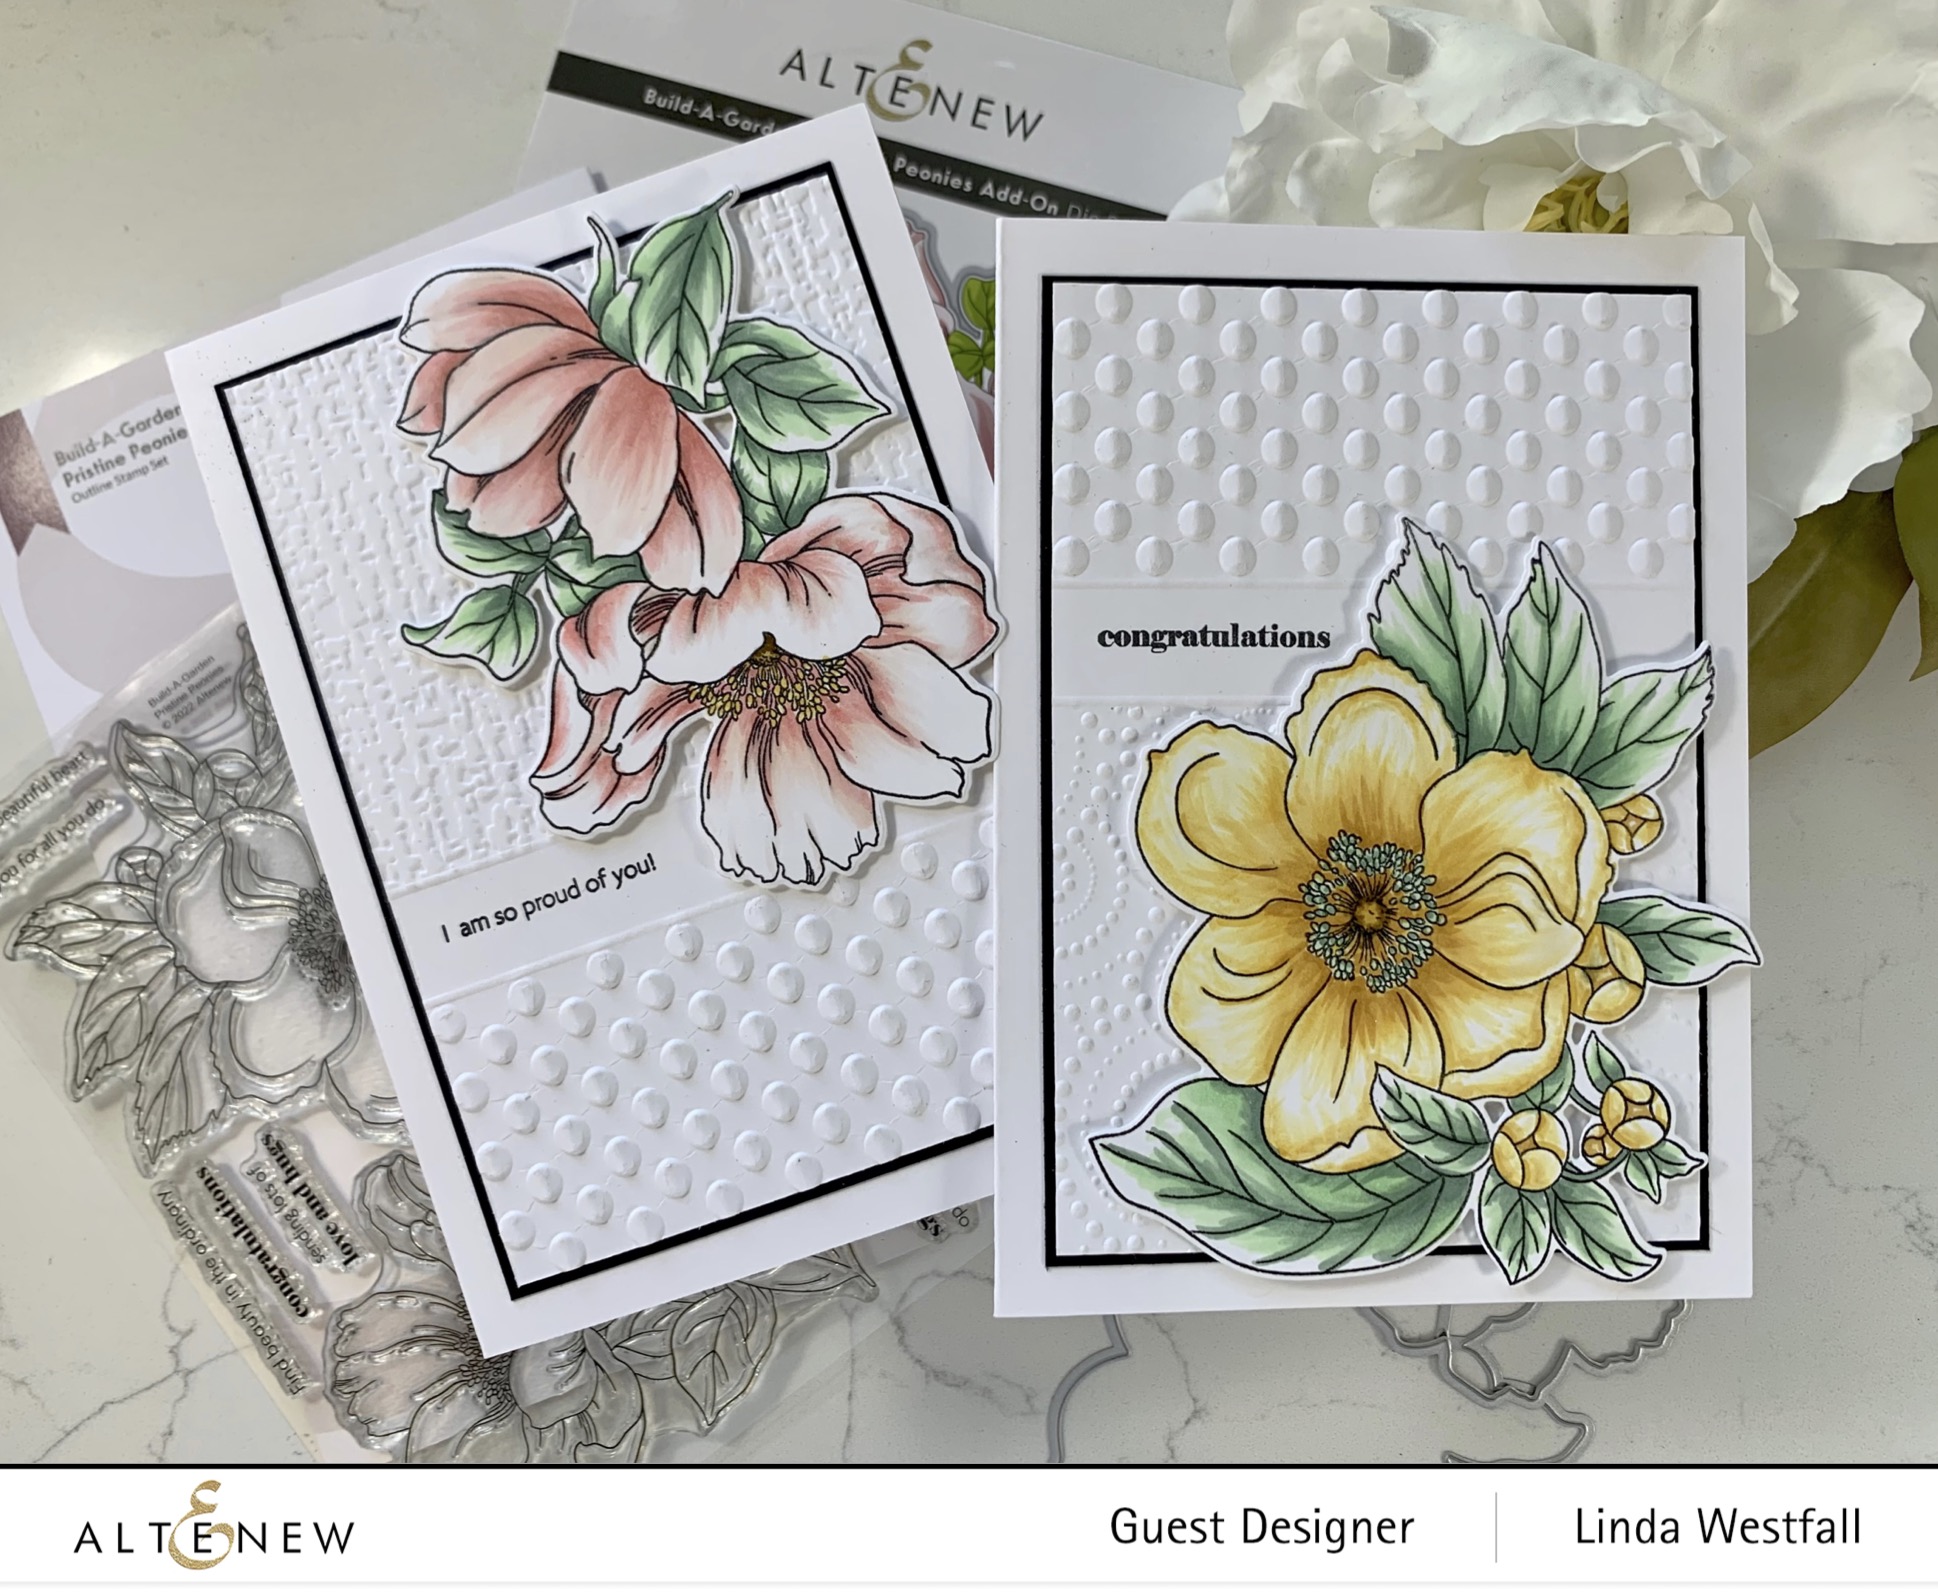
For my final example, I used the Happy Holidays 3D Embossing Folder on the top third of the background panel and then the Starry Patterns 3D Embossing Folder on the bottom, then used a Scoring Board to add some line definition on the edge. And you can't go wrong with the Poinsettia and Pine Stamp Set to finish this one off.


I am a little sad, this is the last blog (hopefully only for a little while) that I have been asked to participate in Altenew's releases. It has been really fun, and I am going to miss the opportunity to purposefully be busy and creative.

Thank you so much for visiting my blog.
Make Today Amazing!

Your last stop is Reiko.
 **Note: Due to strict regulations in Japan, you might not be able to leave a comment on her blog post.

Altenew has a generous giveaway-- leave a comment for your chance to win.

GIVEAWAY

$300 in total prizes! To celebrate this release, Altenew is giving away a $50 gift certificate to 2 lucky winners and a $25 gift certificate to 8 winners! Please leave a comment on the Altenew Card Blog and/or each designer’s blog post on the blog hop list below by 09/28/2022 for a chance to win. 

Altenew will draw 10 random winners from the comments left on each stop of this blog hop and announce the winners on the Altenew Winners Page on 09/29/2022.


Monday, September 12, 2022

ALTENEW: SEPTEMBER 2022 MARVELOUS MONTHLY SUBSCRIPTIONS RELEASE BLOG HOP + GIVEAWAY 

($300 in total prizes)


Hello, 

I love all the monthly subscriptions! and have made three projects for you today. 

If you are joining in the hop, you should have come from Maryam Perez. And just in case, you can go back to the beginning of the hop here. Please leave comment down below for your chance to win an Altenew gift card.
 These monthly sets are absolutely beautiful!

First up:
PAINT-A-FLOWER: HIBISCUS


She's a beauty! I stamped the floral images in Citrus Burst Crisp Dye Ink onto some watercolor cardstock and painted them in with the 24 Pan Watercolor Set. While that was drying, I dry embossed the lovely Motif Tile 3D Embossing Folder and cut it down and adhered it along with a black piece of cardstock onto a white card base. I cut out the Hibiscus flowers and used some liquid glue to adhere them to the card. I used Crisp White Embossing Powder with the Embossing Ink to add a sentiment to some black cardstock and cut it out using the Fine Rings: Circle Dies and adhered it to the card with Instant Dimension Foam Tape.

CRAFT YOUR LIFE PROJECT KIT: FLORAL ACANTHUS


I started this one by stamping the sentiment onto a piece of white cardstock. I used the Satin Tape to tape off the stamp,  and ink it up, then removed the tape and stamped it,  combining several sentiments to get this one. When the ink was dry, I ran it through my die cut machine with the 3D Embossing Folder. I stamped the floral onto some Solar White Cardstock in Permanent Black Ink and used the Stencils to color them in with Pink Pearl, Fresh Lemon, and Firefly Crisp Dye Inks. I also used the stencil to add some glue and then glitter to the flower stamens. When they were dry, I used the coordinating Dies to cut them out. I colored the outside edge of a white card base with the Pink Pearl Ink and adhered everything to it.


BUILD-A-GARDEN: PRISTINE PEONIES

I actually have four cards for this last example. I had a lot of fun creating these cards. The floral image is such a good size, I found it very versatile.

For all the cards I stamped the floral images onto some Solar White Cardstock with Permanent Black Ink

The first two cards I used Artist Markers to color them in, and the last two examples I used the stencils and Crisp Dye ink to color them in.

I used a variety of 3D Embossing Folders to add dimension for the background and a scoring board to separate the different 3D Embossing Folders. On three of them I added the sentiment in that area.


For the first two cards the supplies I used are:

Build-A-Garden: Pristine Peonies
Organic Linen 3D Embossing Folder
Dotty Circles 3D Embossing Folder
Playful Circles 3D Embossing Folder
Permanent Black Ink
Solar White Cardstock
Artist Markers- R400 Blush- Set C, R302 Frosty Pink- Set A, C009 Pink Pearl- Set H, C001 Buttercream- Set B, C014 Butternut- Set I, C013 Pumpkin Pie- Set I, Y337 Sicilian Amber- Set I, G201 Minty Mint- Set H, and G011 Misty Morning- Set I.


For my last two cards the supplies I used are:

Build-A-Garden: Pristine Peonies
Organic Linen 3D Embossing Folder
Dotty Circles 3D Embossing Folder
Playful Circles 3D Embossing Folder
Motif Tile 3D Embossing Folder
Permanent Black Ink
Bold Sentiments Stamp Set
Solar White Cardstock
Mini Blending Brushes
Citrus Burst Crisp Dye Ink
Fresh Lemon Crisp Dye Ink
Maple Yellow Crisp Dye Ink
Rouge Crisp Dye Ink
Frosty Pink Crisp Dye Ink
Coral Berry Crisp Dye Ink
Paper Bag Crisp Dye Ink


Bamboo Crisp Dye Ink
Olive Crisp Dye Ink
Shadow Creek Crisp Dye Ink

I hope you have enjoyed these examples- there are lots more amazing projects!

Your next stop is Tenia Nelson.

Make Today Amazing!


GIVEAWAY
$300 in total prizes! To celebrate this release, Altenew is giving away a $50 gift certificate to 2 lucky winners and a $25 gift certificate to 8 winners! Please leave a comment on the Altenew Card Blog and/or each designer’s blog post on the blog hop list below by 09/18/2022 for a chance to win. 
 
Altenew will draw 10 random winners from the comments left on each stop of this blog hop and announce the winners on the Altenew Winners Page on 09/19/2022.

Wednesday, August 31, 2022

ALTENEW: SEPTEMBER 2022 WINTER MAGIC COLLECTION RELEASE BLOG HOP + GIVEAWAY ($300 in total prizes)


Hello,

I am so happy you joined me today, and if you are playing along on the hop, you should have found your way here from Maryam Perez. You can find more info over on the Altenew Card Blog, and you can shop all the goodies with the links I’ve provided for you down below, THANKS! 


This is one of those cards that I loved all the elements, but, when put together and photographed it, it wasn't what I was hoping for. My circle frame ended up too large.- but, it was staying the way it was. If I did this again, The circle frame would be smaller. 


Well, I ended up pulling this apart and rearranging things yesterday.


I think why I went with the size of frame that I did in the beginning, was because that was the size of circle dies I liked better. But, I think the second card is a better version. I used the Shrub Rose Stamp and Dies along with Itty Bitty Branches Die Set to create the foliage for the side of the circle frame that I created using the Fine Rings Circle Die Set long with another from my stash.  I colored the flowers with the Artist Markers in R302, and G011, using the colorless blender to get a variation on the color. I Gold Heat Embossed the sentiment onto some velum and cut it out with the circle die as well. I dry embossed a piece of white cardstock with the Organic Linen 3D Embossing Folder and adhered that to a white card base with two strips of Gilded Glitter Cardstock on either side of it. Adhered everything to the card and finished with some Satin Gold Sequins.


I created the background for this card by blending Silverstone, Cloudy Sky, and Dark Night Crisp Dye Inks onto a Solar White Panel with Small Blending Brushes, the darkest around the outside. I colored another piece of cardstock with the Cloudy Sky Ink, and cut the snowflakes from the Layered Snowflakes 2 Dies as well as a small one from the Layered Snowflakes Dies. I cut more from white and silver glitter cardstock and adhered them to the outside of the panel. I cut the "wishing" from  Tiny Sentiments: Wishing dies in some Dark Night colored cardstock. Stamped the sub-sentiment on some white cardstock and adhered everything to a white card base that I colored the outer edge with the Dry Night Ink.


I've used the Hawaiian Shores Markers and the Poinsettia & Berries Stamp Set to color the background of this card. I colored with the stamp with the Evergreen pen, - spritzed it with water and then stamped it onto a Solar White panel, then spritzed and stamped it again. (second generation) On a separate piece of cardstock , I stamped the poinsettia layers in Permanent Black, Heart Beat, and Velvet Inks. Then I used a white chalk pencil to lighten up the inside of the leaves and used the Evergreen Pen to color in the flower center. Used the Die to cut it out and adhere it to the card with Instant Dimension Foam Tape. Stamped the sentiment with Obsidian Black Ink.


I made this tag like I made the card, but added stamped berries to the mix.


For the coasters, I was given a wood burning tool almost two years ago, and thought I would try it out. And what better way, than beautiful images like in this set. I stamped the image with permanent black ink, and then used a wood burning tool to enhance the image. If you were lucky enough to get the Circle Of Feathers Stamp Set free, or pay for it (for she’s a beauty!) I made a coaster like the card I created for that set.

This was a fun test of the little wood burning tool I received. I hope you have a fun time completing the rest of the hop. Your next stop is Nathalie DeSousa.

Thanks for Visiting!
Make Today Amazing!

GIVEAWAY

$300 in total prizes! To celebrate this release, Altenew is giving away a $50 gift certificate to 2 lucky winners and a $25 gift certificate to 8 winners! Please leave a comment on the Altenew Card Blog and/or each designer’s blog post on the blog hop list below by 09/06/2022 for a chance to win. 


Altenew will draw 10 random winners from the comments left on each stop of this blog hop and announce the winners on the Altenew Winners Page on 09/07/2022.


FREE GIFT OFFER

Monday, August 22, 2022

ALTENEW: AUGUST 2022 ENDLESS AMBITION RELEASE BLOG HOP + GIVEAWAY 

($300 in total prizes)


Hello! 
You may have found your way here from Michelle Burnier if you are following the blog hop. You can also go back to the beginning over on the Altenew Card Blog.

Shop the release here or shop from the link down below.


I have 4 projects today, and my first starts out by cutting all the pieces parts, except the frame, from the Layered Ornate Frame Die Set from some Solar White Cardstock. I colored them with some Crisp Dye Inks and some Mini Blending Brushes. I blended the Misty Morning and Cloudy Sky Inks around the outer edges of a white card base and cut the frame from Gold Mirror Cardstock and adhered that to the card. Then created a rectangle frame with a Fine Liner Pen. I adhered the flower and leaf layers together and then adhered them to the card. Colored a piece of cardstock with Cloudy Sky and cut the "hello" from the Sweet Sentiments Die Set out twice, adhered them together and then to the card. To finish this one, I added some rhinestones to the flower centers.


I dry embossed the background panel from the Peaceful Poppies 3D Embossing Folder, trimmed it down to fit onto a white card base with a strip of Gilded Glitter Cardstock running down the left side.
I adhered the Monochrome Wide Washi to a piece of white cardstock and cut out the flowers. I adhered it to the card. I cut the "thanks" from the Gilded Glitter Cardstock that has the Double-Sided Adhesive Sheets on the back of, and adhered that to the card. Finally, I adhered some rhinestones to the flower centers.


I created the background by dropping Alcohol Inks and alcohol on the top of the photo paper and then picking it up and using a puffer tool to move the ink down the paper. I used the Sweet Sentiments Hot Foil Plates and the Sweet Sentiments Dies to create the "celebrate" sentiment. I added the sub sentiment from the One-Go Birthday Greetings Stamp and Dies and added both to the panel.


YAY! How cute is this die? The two dies in the Word Balloon Die Set have little balloon tails, so you can make the words seem like they are balloons. But, I chose to cut off the little balloon ends, and easy peasy- just the word remains. I ink blended down the word with crisp dye inks and then used the same inks to blend through the Geo Triangles Stencils onto a white cardstock panel. I cut a couple more "yay's" from black cardstock and adhered them together and then to the panel. Added a sentiment from the One-Go Birthday Greetings Stamp and Die Set which was heat embossed with Crisp White Powder. And after I assembled the card, I added some little details with a white gel pen.


Thanks for the time you spent here with me.
Make Today Amazing!

Your next stop is Jenny Colacicco.

GIVEAWAY

$300 in total prizes! To celebrate this release, Altenew is giving away a $50 gift certificate to 2 lucky winners and a $25 gift certificate to 8 winners! Please leave a comment on the Altenew Card Blog and/or each designer’s blog post on the blog hop list below by 08/28/2022 for a chance to win. 


Altenew will draw 10 random winners from the comments left on each stop of this blog hop and announce the winners on the Altenew Winners Page on 08/29/2022.


adding pinterest script 3. Changing the Position of the Pin it! button The cool thing about this code is that you have some freedom over where the Pinterest button for Blogger will go over the image. Take a look at the code that you just copied and pasted into the HTML for the word 'center'.