Friday, July 16, 2021

ALTENEW JULY VIDEO HOP


Hi! 
Hope you have had fun visiting the videos on the hop today. Karen Baker was the  video before mine, and this one is the last. You've made it to the end.

I've used the Cool Decades Stamp Set along with Crisp Dye inks in Firebrick, Buttercream, Sand Dunes, Frayed Leaf, Sea Glass,
and Desert Night to randomly stamp the images all over this 6" x 6" white card panel.

I used the Cool Doodles 3D embossing folder and ran it through my die cutting machine using the 3D embossing folder instructions.


I used the shape that look like a shoe to stamp the sentiment on. I first double stamped it in Buttercream Crisp Dye Ink, then I lined up the stamp that says; "to the best thing that came out of the" and masked off the "happy birthday" part of it with some washi tape, inked it up with Permanent Black ink, removed the tape and stamped it.

I used the Just A Number Die Set to cut out the "happy birthday" twice out of black card, and once out of gold mirror card. glued them all together with liquid glue. I adhered the panel to a rust colored card base, and then adhered the happy birthday with liquid glue, and the little shoe shape with foam adhesive.

I hope you have enjoyed the hop.
Thanks for visiting.
Make today amazing!


Giveaway Prizes

$200 in total prizes! Altenew is giving away a $25 gift certificate to 8 lucky winners. Please leave a comment on the Altenew video and/or each designer’s YouTube video on the hop list by 07/22/2021 for a chance to win. Altenew will draw random 8 winners and announce them on the Altenew Winners Page on 07/24/2021.


Thursday, July 15, 2021

ALTENEW JULY MINI DELIGHT: TINY FOLIAGE INSTAGRAM HOP


Hello. Hope you are having great day!

I have created a card with the Tiny Foliage Stamp and Die set.


When I saw this set, the first thing that I saw was a reindeer, so that's what I have done. Christmas in July, right?


I have used the dies to cut out the shapes in red, white, and khaki. I then colored in the eyes with the Fine Liner Pen Set.


I used the Mini Christmas Stamp set with Vineyard Berry and Permanent Black inks to stamp the sentiment onto a white card panel.


I stamped the berries and leaves onto a scrap of white cardstock with Vineyard Berry, Permanent Black, Just Green, and Hunter Green, rocking the edge in the darker color to add dimension. Cut them out, and adhered them to the panel.


I finished by adhering the reindeer parts to the panel and then adhering the panel to a red card base.

Thanks for visiting. 
Make today Amazing!

Altenew (@altenewllc)

Nicole Watt (@pixelmavensretreat)

Jenny Colacicco (@jenccards)

Nathalie DeSousa (@tachita55)

Sandhya Iyer (@sanjuscreations)

Virginia Lu (@yesvirginialu)

Amanda Baldwin (@happy_arty_days)

LauraJane (@mammacooksalot)

Tenia Nelson (@tenianelson)

Terri Koszler (@altenew_planner_girl)

Seeka (@skypaperscissors)

Verity Biddlecombe (@prettylittlebutton)

Bridget Casey (@bridgetcaseydesigns)

Carol Hintermeier (@c.ann.h)

Daniel Diaz (@danieldiazb88)

Nenette S. Madero (@mylittleatticstudio)

Linda Westfall (@awlthatglitters) (me😄)

(Last stop)............. Tina Smith (@cardsandcoffeetime) 

Monday, July 12, 2021

ALTENEW CRAFT YOUR LIFE PROJECT KIT: SEASONAL BLOOMS RELEASE BLOG HOP + GIVEAWAY


Hi! You have probably found your way here from Verity Biddlecombe. Love her striped background and blue flowered cards.

Today I'm joining Altenew and their first-ever Craft Your Life Project Kit. This kit features a 6x8 stamp set, coordinating die set, as well as a stencil and embossing folder to fit a theme. This month's theme is Seasonal Blooms. She is a BEAUTY! More info can be found here.

Note: These are sold in a kit and not separately.


I placed the stencils on the stamped panel and blended the inks onto it, using the darker colors to add dimension. I did have to mask off between the little flowers and the sunflower. But, other than that, it was really easy to get a great look.


I used the Seasonal Blooms Die to cut it out. On another white panel I stamped the Whimsical Herringbone stamp with Sea Glass ink. 


I cut the "Thanks" from the Seasonal Blooms Die set out of white cardstock three times, and the background "Thanks"  from brown cardstock one time.  I adhered them all together with some liquid glue, I cut down the panel and then adhered the panel to a brown card base and the sentiment to the top. I used a white gel pen to add thefts on the centers of the sunflowers and some details on the other flowers.


These next two cards are done the same way, just on different colored cardstock.


I ran the Blooming Through The Seasons 3D Embossing folder through my die cutting machine twice with each of the different colors of cardstock. I'm using the Gemini Jr. die cutting machine and the sandwich that I use for my machine is; cutting plate, magnetic shim, 3D embossing folder with the cardstock inside, and plastic shim on top.

I started with the Tsunkineko white VersaColor pigment ink pad and smoothed that over the raised surface of the panels. The color of this ink was a little yellow so I used Hampton Art white pigment ink over the top, and I liked this one much better.

For the green card, I cut the "thanks" three times out of white cardstock and the outline "thanks" out of the green cardstock. I adhered them together with some liquid glue and adhered that to the panel. When everything was dry, I adhered the panel to a white card base.
 For the blue card, I cut the "hello" three times out of white cardstock and the outline "hello" out of the blue cardstock. Used liquid glue to adhere them together and then to the panel. Let it dry, and adhered it to a white card panel.
Thank you so much for visiting. Hope you enjoy the hop.


Make Today Amazing!

Next up on the hop is Lilith Eeckles.

Giveaway Prizes

$300 in total prizes! To celebrate this release, Altenew is giving away a $50 gift certificate to 2 lucky winners and a $25 gift certificate to 8 winners! Please leave a comment on the Altenew Card Blog and/or each designer’s blog post on the blog hop list below by 07/18/2021 for a chance to win. Altenew will draw 10 random winners from the comments left on each stop of this blog hop and announce the winners on the Altenew Winners Page on 07/20/2021.


Monthly Subscription Description:

Get early access to our NEW Craft Your Life Project Kit before it is released on our store by subscribing to our Craft Your Life Project Kit Monthly Subscription Plan! 

Don't worry if the project kit goes out of stock! When you are subscribed to the monthly subscription, you are guaranteed a spot in our New Craft Your Life Project Kit each month.

The Craft Your Life Project Kit comes with a 6 x 8 Stamp set and its coordinating Die Set, Stencil, and Embossing Folder. Note that the items included in this kit are not sold separately.


The price of the subscription is $49.99/ month, regularly $59.99, plus shipping and tax (calculated based on the location of the shipping address). This will Auto-renew every month until it is canceled

Click here to receive the Craft Your Life Project Kit Monthly Subscription Plan (14% off)


Wednesday, July 7, 2021

ALTENEW CRAFT-A-FLOWER: DAFFODIL & GLITTER CARDSTOCK RELEASE BLOG HOP + GIVEAWAY


Welcome!
You should have come from Kelly Griglione.

You can shop or find out more at Altenew. 

I started my card by cutting all the shapes from Altenew Craft-A-Flower Daffodil out of white cardstock.

Then using the Altenew Blending Brushes I added color to the different parts with Altenew Crisp Dye Inks.

For the leaves I used Sweet Leaf, Just Green and Hunter Green.

For the flower I used Dew Drops Ink.

For the flower center I used Sunkissed, Autumn Blaze, Firebrick, and Heart Beat. Then deepened up the yellow with Honey Drizzle Ink.

I blended Sea Breeze, Desert Night, Just Green, and Hunter Green on a white card panel and splattered it with some White and Black Gouache. Cut the Altenew Twigtastic Die from another piece of white cardstock. I used liquid glue to glue the flower together and adhered the flower and the Twigtastic die cut to the panel.

Lastly, I stamped the sentiment from Altenew Fairy Tale Florals Stamp Set onto a piece of black cardstock using Altenew Embossing Ink and heat embossing it with white embossing powder Iadhered that to the card, and then adhered the panel to a blue card base.
 
Thanks for visiting!
Make today Amazing!

Next up on the hop is Natasha Davies.

Giveaway Prizes

$200 in total prizes! To celebrate this release, Altenew is giving away a $50 gift certificate to 2 lucky winners and a $20 gift certificate to 5 winners! Please leave a comment on the Altenew Card Blog and/or each designer’s blog post on the blog hop list below by 07/13/2021 for a chance to win. Altenew will draw 7 random winners from the comments left on each stop of this blog hop and announce the winners on the Altenew Winners Page on 07/15/2021.


Linda Westfall (you are here)

Monday, July 5, 2021

ALTENEW ECLECTIC VIBES STAMPS/DIES/STENCILS/EMBOSSING FOLDERS COLLECTION RELEASE BLOG HOP + GIVEAWAY


Hello! 
You should have come from Keren Baker. If you would like more info about this release visit Altenew.


I have made 4 projects for todays release.

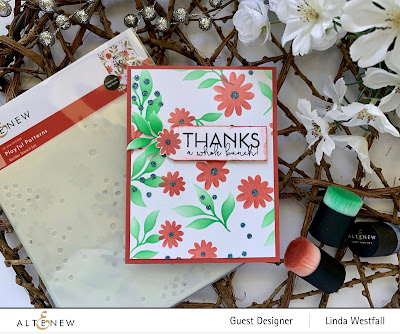
I love these new Playful Pattern Stencils. I used 3 of the 4 stencils for the background of this card.

I started with the leaf stencil and used Altenew Blending Brushes to blend with Sweet Leaf and Just Green Crisp Dye Inks.


I then took the flower layer and used Rouge and Velvet Crisp Dye Inks to make the flowers.

Then I took the dotted layer to create the flower centers and the random dots around the panel with Desert Night Crisp Dye Ink. While I had the flower center stencil in place, I used some Decofoil transfer gel and spread that in the dots and added some glitter on top, then washed the stencil.


I stamped the sentiment from Altenew Bold Bunch Stamp Set with Altenew Permanent Black Ink onto a piece of white cardstock.

Then used a leaf die from Altenew Craft-A-Flower Buttercup Die set and cut a stencil from another piece of cardstock and blended Sweet Leaf and Just Green inks onto  the end of the sentiment strip and used the die again to cut it out. 

I used the flower and dot stencils to make a flower next to the sentiment in the same manner as for the panel and cut it out.

I rubbed the edges of the sentiment strip into the Velvet Ink and blended it a bit.


I adhered the panel to red card base and then adhered the sentiment and leaf to the panel.


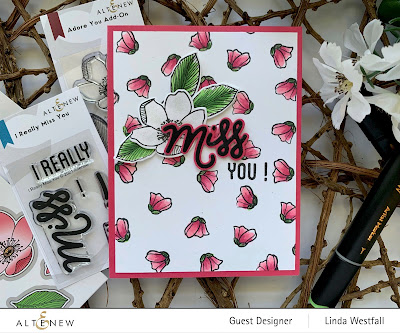
For the second card, I stamped the small flower from the Altenew Adore You Add-On Stamp Set over a white cardstock panel with Altenew Permanent Black Ink.

On a different piece of cardstock I stamped the large flower and several leaves.


I've used Altenew Artist Markers to color in the flowers on the panel and the leaves on the other with colors R601 Rose Quartz, R502 Pink Diamond, R504 Pinkalicious, R616 Razzleberry, C003 Rubellite, G425 Shadow Creek, G446 Mountain Pine, G 503 Firefly, G515 Grass Field, C004 Citrus Burst, and S Jet Black.

For the large flower I used a Wink of Stella glitter pen.


I used the Adore You Add-On Dies to cut out the larger flower and leaves.

The I Really Miss You Stamp and Die Bundle were used to stamp and cut the sentiment out of black and pink cardstock.


I adhered the panel to a pink card base, then adhered the flower and leaves to the card.


For my third card I stamped the outline of the television all over a white panel from Altenew Vintage Vibes Stamp set with  Limestone Crisp Dye Ink, then rubbed it along the edges as well.

I double-stamped another television with the legs onto another white panel with Silver Lake and Sand Dunes Inks.


I Stamped the detail layer of the television with Gray Denim Ink. 

Then the inside of the television with Cloudy Night Ink. I went back and added some detailing to the television with Altenew's Fine Liner Pen Set. Then Cut it out with The Vintage Vibes Die Set.

I added a layer of Glossy Accents to the inside of the television and set it aside to let it dry while I cut out the "Happy Birthday" from black cardstock with the Just A Number Die Set three times and glued them together with some liquid adhesive.


I adhered the panel to a khaki card base and the adhered the television and the sentiment to the top.

And finally, I stamped a secondary sentiment inside the card from the set.


For my fourth and final card I have used the Delightful Frame 3D Embossing folder.

I used the appropriate layers for 3D embossing for the die cutting machine, and ran the folder through it, with a piece of tan cardstock.


I used the Wink Of Stella Glitter pen and added it all over the raised portion of the panel.

Then I used the smallest pen from the Fine Liner Pen Set to add details over the flowers.


I stamped a sentiment from the Bouquet Of Love Stamp Set with Permanent Black Ink in the center of the panel.


I adhered the panel to a piece of black cardstock, then to another tan card base.

I love the simplicity of this last card. 

Thanks for visiting and have fun hopping!

Make today Amazing!


Next up on the hop is Keeway Tsao. (Full hop list below).


Giveaway Prizes

$300 in total prizes! To celebrate this release, Altenew is giving away a $50 gift certificate to 2 lucky winners and a $25 gift certificate to 8 winners! Please leave a comment on the Altenew Card Blog and/or each designer’s blog post on the blog hop list below by 07/11/2021 for a chance to win. 

Altenew will draw 10 random winners from the comments left on each stop of this blog hop and announce the winners on the Altenew Winners Page on 07/13/2021.


Here are THREE ways to get a FREEBIE to kickstart your creativity! Free gift will be added to cart automatically. 

adding pinterest script 3. Changing the Position of the Pin it! button The cool thing about this code is that you have some freedom over where the Pinterest button for Blogger will go over the image. Take a look at the code that you just copied and pasted into the HTML for the word 'center'.